Photographing Bats in Flight by Andrew McCarthy FRPS 02/12/23
Photographing Bats in Flight by Andrew McCarthy FRPS 02/12/23 Read More »

Join Andrew McCarthy on a series of nature photography courses based in Devon during summer 2022.
Each workshops will be aimed at ‘improver’ photographers who want to get to grips with the challenging genre of nature photography.
The first workshop will start on the 24th May 2022 and finish on the morning of the
26th. Please contact Andrew for other dates.
Andrew will first give an overview of the camera settings you will be using during the workshop and will discuss the variety of compositional techniques you can use to enhance your images. Over the following two days we shoot in a variety of locations within 20 miles of Exeter where there are many opportunities for photography of wildflowers, insects and other wildlife.
Once the course is over and you have had a chance to reflect on your workshop experience, you will have an opportunity for a 1:1 critique / discussion session with Andrew via Zoom, during which you can discuss your images. This is part of the workshop teaching package and is free of charge.
Equipment requirements:
• A DSLR or Mirrorless camera together with a macro lens (or extension tubes/close-up dioptre) for insects and plants, as well as a wide angle and telephoto lenses (or a zoom) for landscapes, and a sturdy tripod – preferably one with a removable centre column.
• Spare memory cards and sufficient batteries to carry you through a full days shooting.
• We have limited kit for hire if you don’t have all of this equipment yourself; Let us know in advance if you have any specific requirements and we will do our best to help.
Clothing and fitness level:
• We will be working outdoors, possibly in wet conditions, so appropriate clothing including a waterproof jacket and trousers, are highly recommended.
• Late May can be very warm so lightweight clothing, a sunhat, sunscreen, a water bottle, midge repellent and a tick removal tool.
• We will need to walk reasonable distances (up to four miles) on potentially wet / muddy and uneven ground, so we also recommend stout boots and wellingtons, with a good grip and are fit enough to negotiate uneven and rough terrain unaided.
• Nature photography can involve lying on the ground, however whilst this is optional it often results in a better image!
If you have any queries about your experience level, fitness, equipment suitability or our approach to Covid19 security, please contact Andrew to discuss at info@andrewmccarthyphotography.co.uk.
Price and venue:
£400.00 per person non-residential
Nature photography workshop – Tuesday May 24th to Thursday May 26th 2022 Read More »
I have held a licence from Natural England* to survey and photograph bats since 2001, but for various reasons I had never fulfilled my long-held aspiration of photographing these nocturnal, fast-moving and unpredictable creatures in flight until 2020. Lockdown in spring of last year provided me with the time and opportunity to make a start on this long-anticipated project.
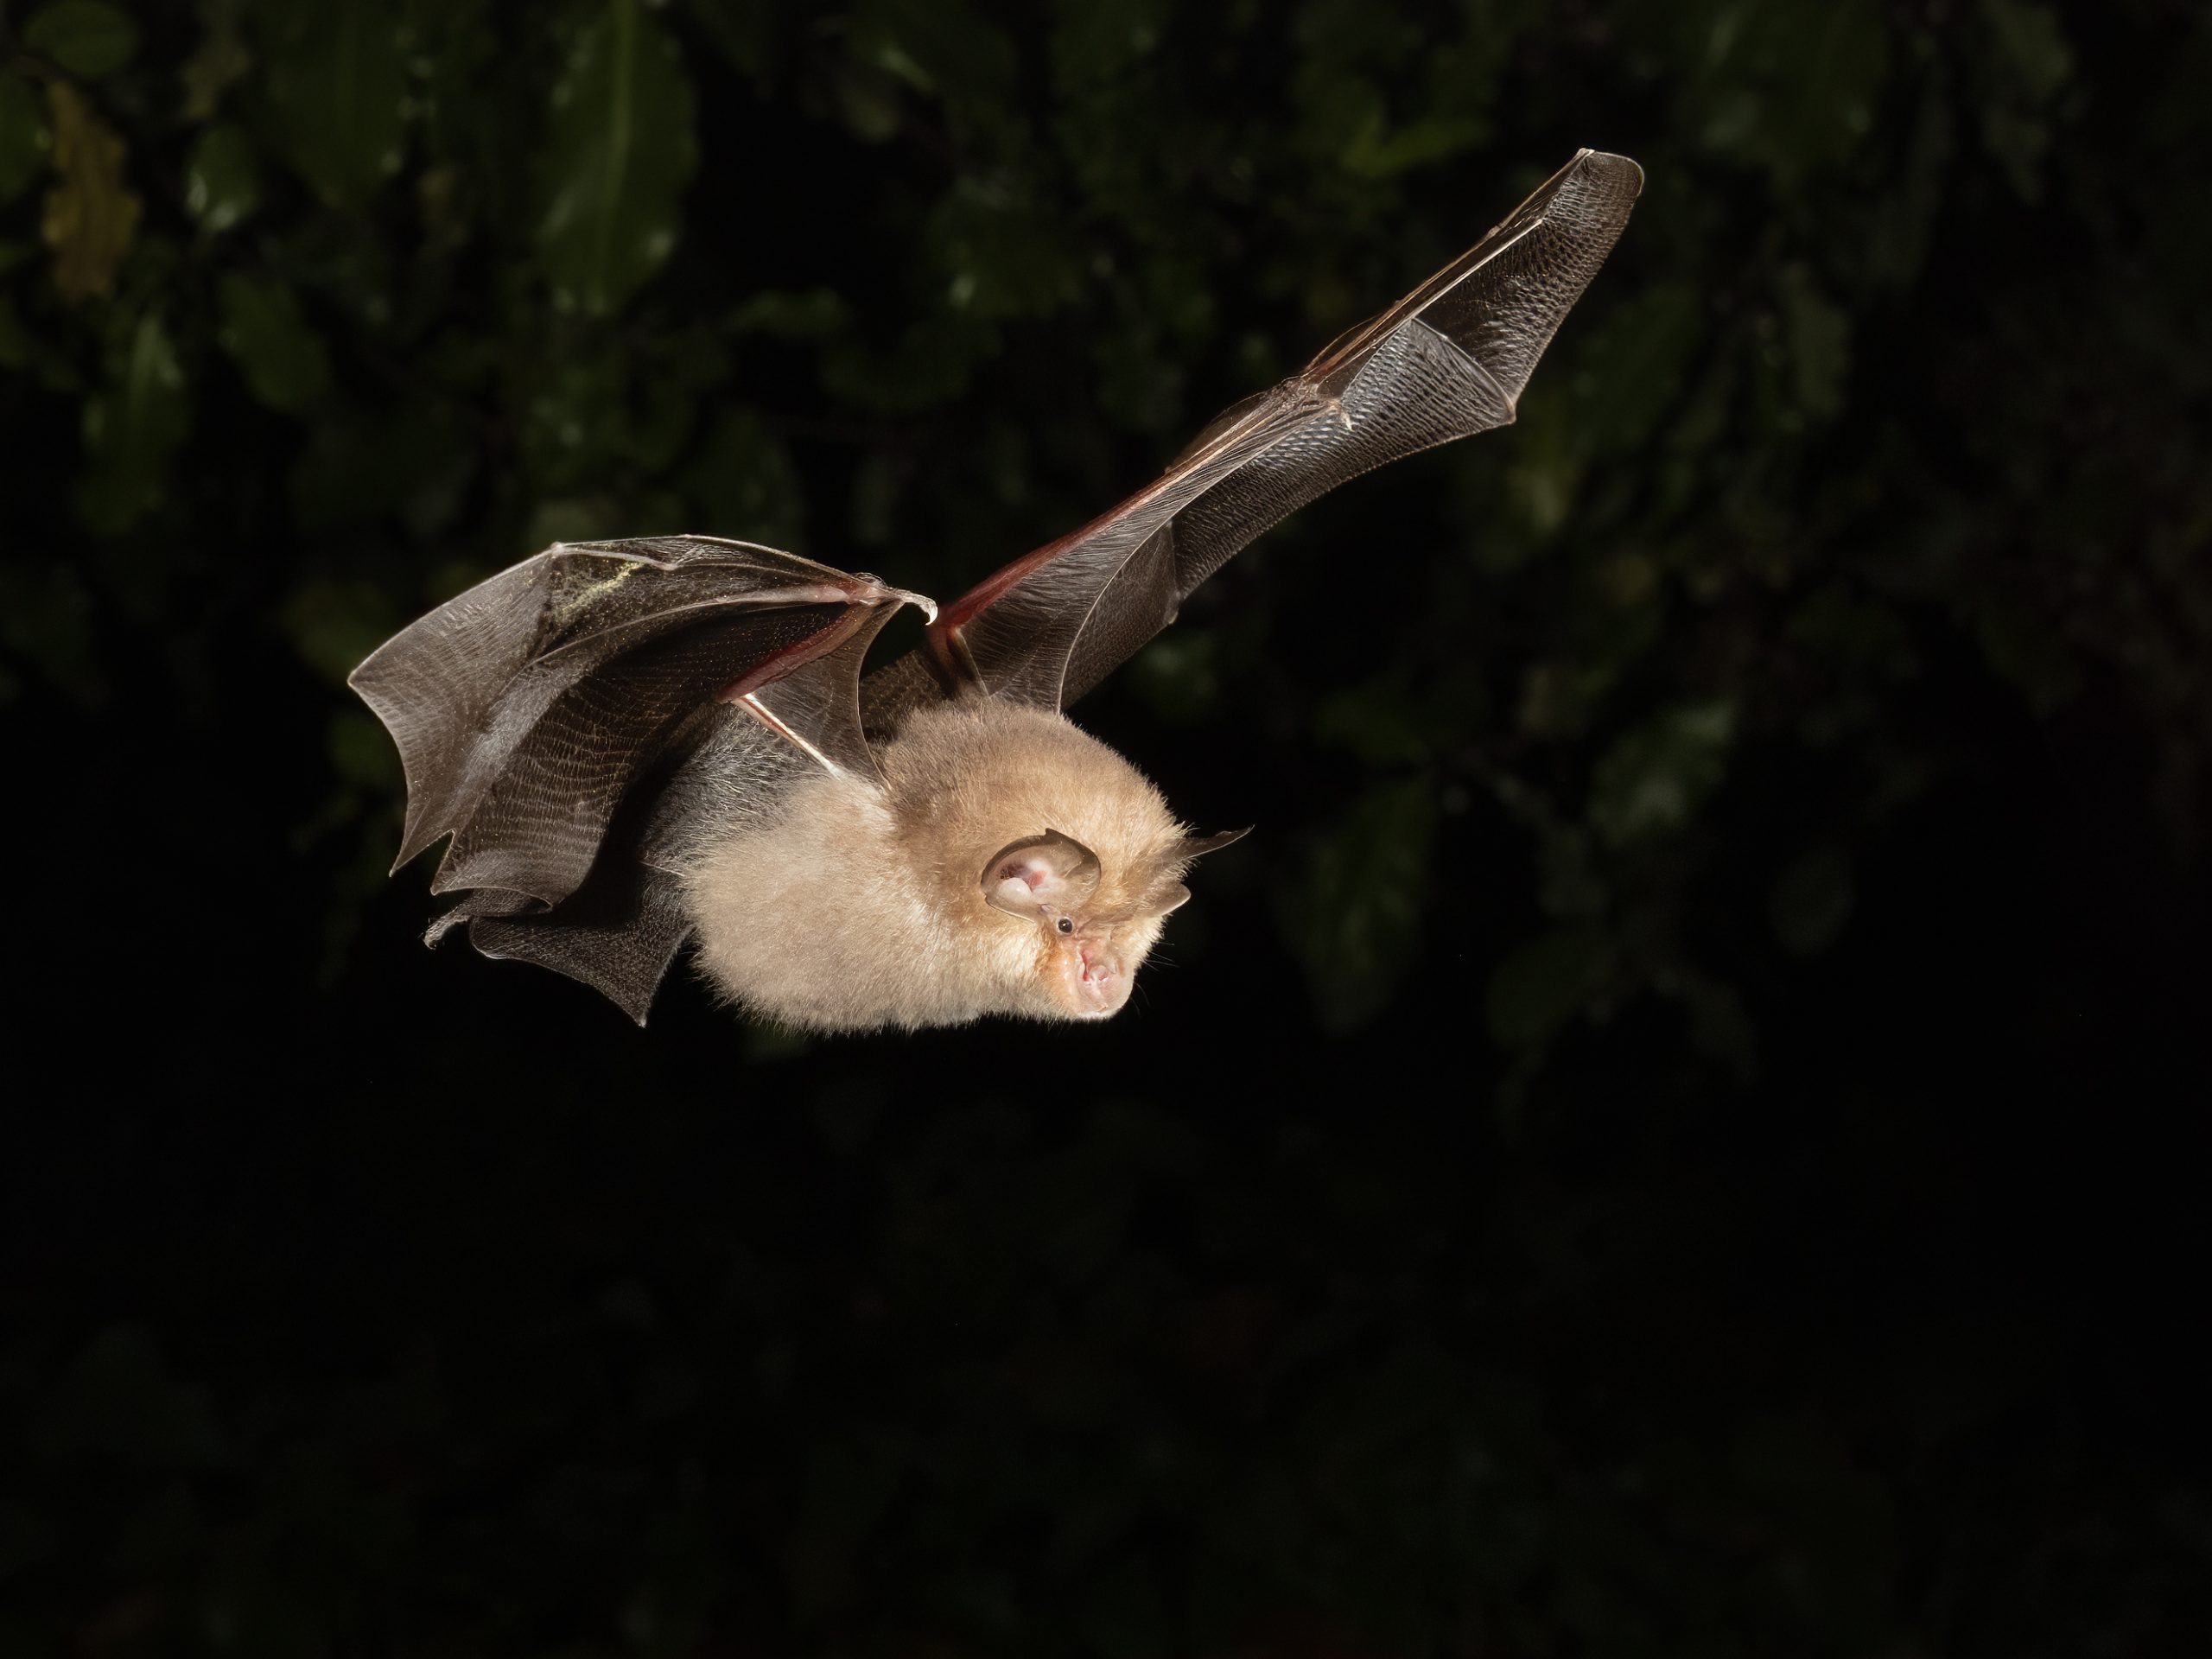
Fortunately, I have a ‘night roost’ for small numbers of the nationally rather rare Lesser horseshoe bat at the rear of our Devon house, so I had the perfect location for initial experimentation. After extensive research, I found that the simplest photographic technique would be to use a laser beam-type trigger to fire multiple flashes, whilst the camera shutter remained open. This would avoid the problem of shutter lag (during which time a bat can fly an unpredictable distance past a pre-set focus point). By trial and error I found that repeated 30 second exposures throughout the night were fine for our house roost, since the small number of bats present meant there would be minimal risk of a frame capturing more than one animal per shot (many bats passing through the frame could result in ghosted images).
I moved from Canon full frame to Olympus in early 2018 for my wildlife work, and at the beginning of the project I had reservations about whether the Olympus M43 sensor – good though it undoubtedly is – would be up to such a demanding task as high speed night-time photography. Whilst I did have to understand and work within the capability of the M43 sensor, and whilst some images required very careful processing to control occasional noise in the shadows, I was pleased to find the Olympus system is more than capable of capturing great bat images, as I hope you will agree. For the images in this blog entry I used a tripod-mounted Olympus EM1x camera coupled with short zoom lenses (including the Olympus 7-14mm f2.8). The images were lit with speed-light flashes fired directly by a laser beam trigger (or manually when flashes were set to ‘strobe’ mode).
My biggest challenge at the outset was pretty basic – how to focus accurately? Taking into account the fast response time of my laser trigger (around 10ms) and the estimated bat flight speed (determined from research papers as between 3ms-1 and 5ms-1), I estimated that pre-focusing 1.5cm beyond the beam would take account of the likely distance travelled by the bats before the flashes fired. The other potential issue was battery life. I found after initial experimentation that when shooting continuously, the EM1x with fully charged batteries would run for around 5.5 hours. Therefore, by switching the camera on around 11.00 pm the system would run until just after dawn. This was perfect for capturing bats using the roost during the night since they would leave to return to their nearby main roost well before sunrise anyway. Later in the project I invested in an adaptor and power pack so the equipment could be switched on much earlier in the evening, allowing an easier and more consistent setup during daylight hours.
The first few weeks were disappointing and frustrating in equal measure – most exposed frames were dark, and whilst a few shots contained bats, most were out of focus or had part of the animal out of frame. However, by incrementally adjusting camera framing and settings, by gradually adjusting flash settings and flash head position, and by experimenting with focus point positioning, I gradually began to get improved results. This nightly trial and error (which included a period of six weeks when I experienced technical challenges with unsynchronised flashes and image ghosting) finally enabled me to establish a consistent system of photographing emerging bats, as well as of bats flying through nearby wooded vegetation. I eventually settled on the following settings for the non-strobe bat shots – ISO 640, a 30 second exposure (with the camera set to continuous shooting) at f10, with five flashes at 1m distance from a pre-set focus point of 1.5cm from the laser beam. All flashes were in manual mode at 1/16th power to give an ‘effective shutter speed’ of around 1/8000th of a second (i.e. sufficient to stop in-flight action).
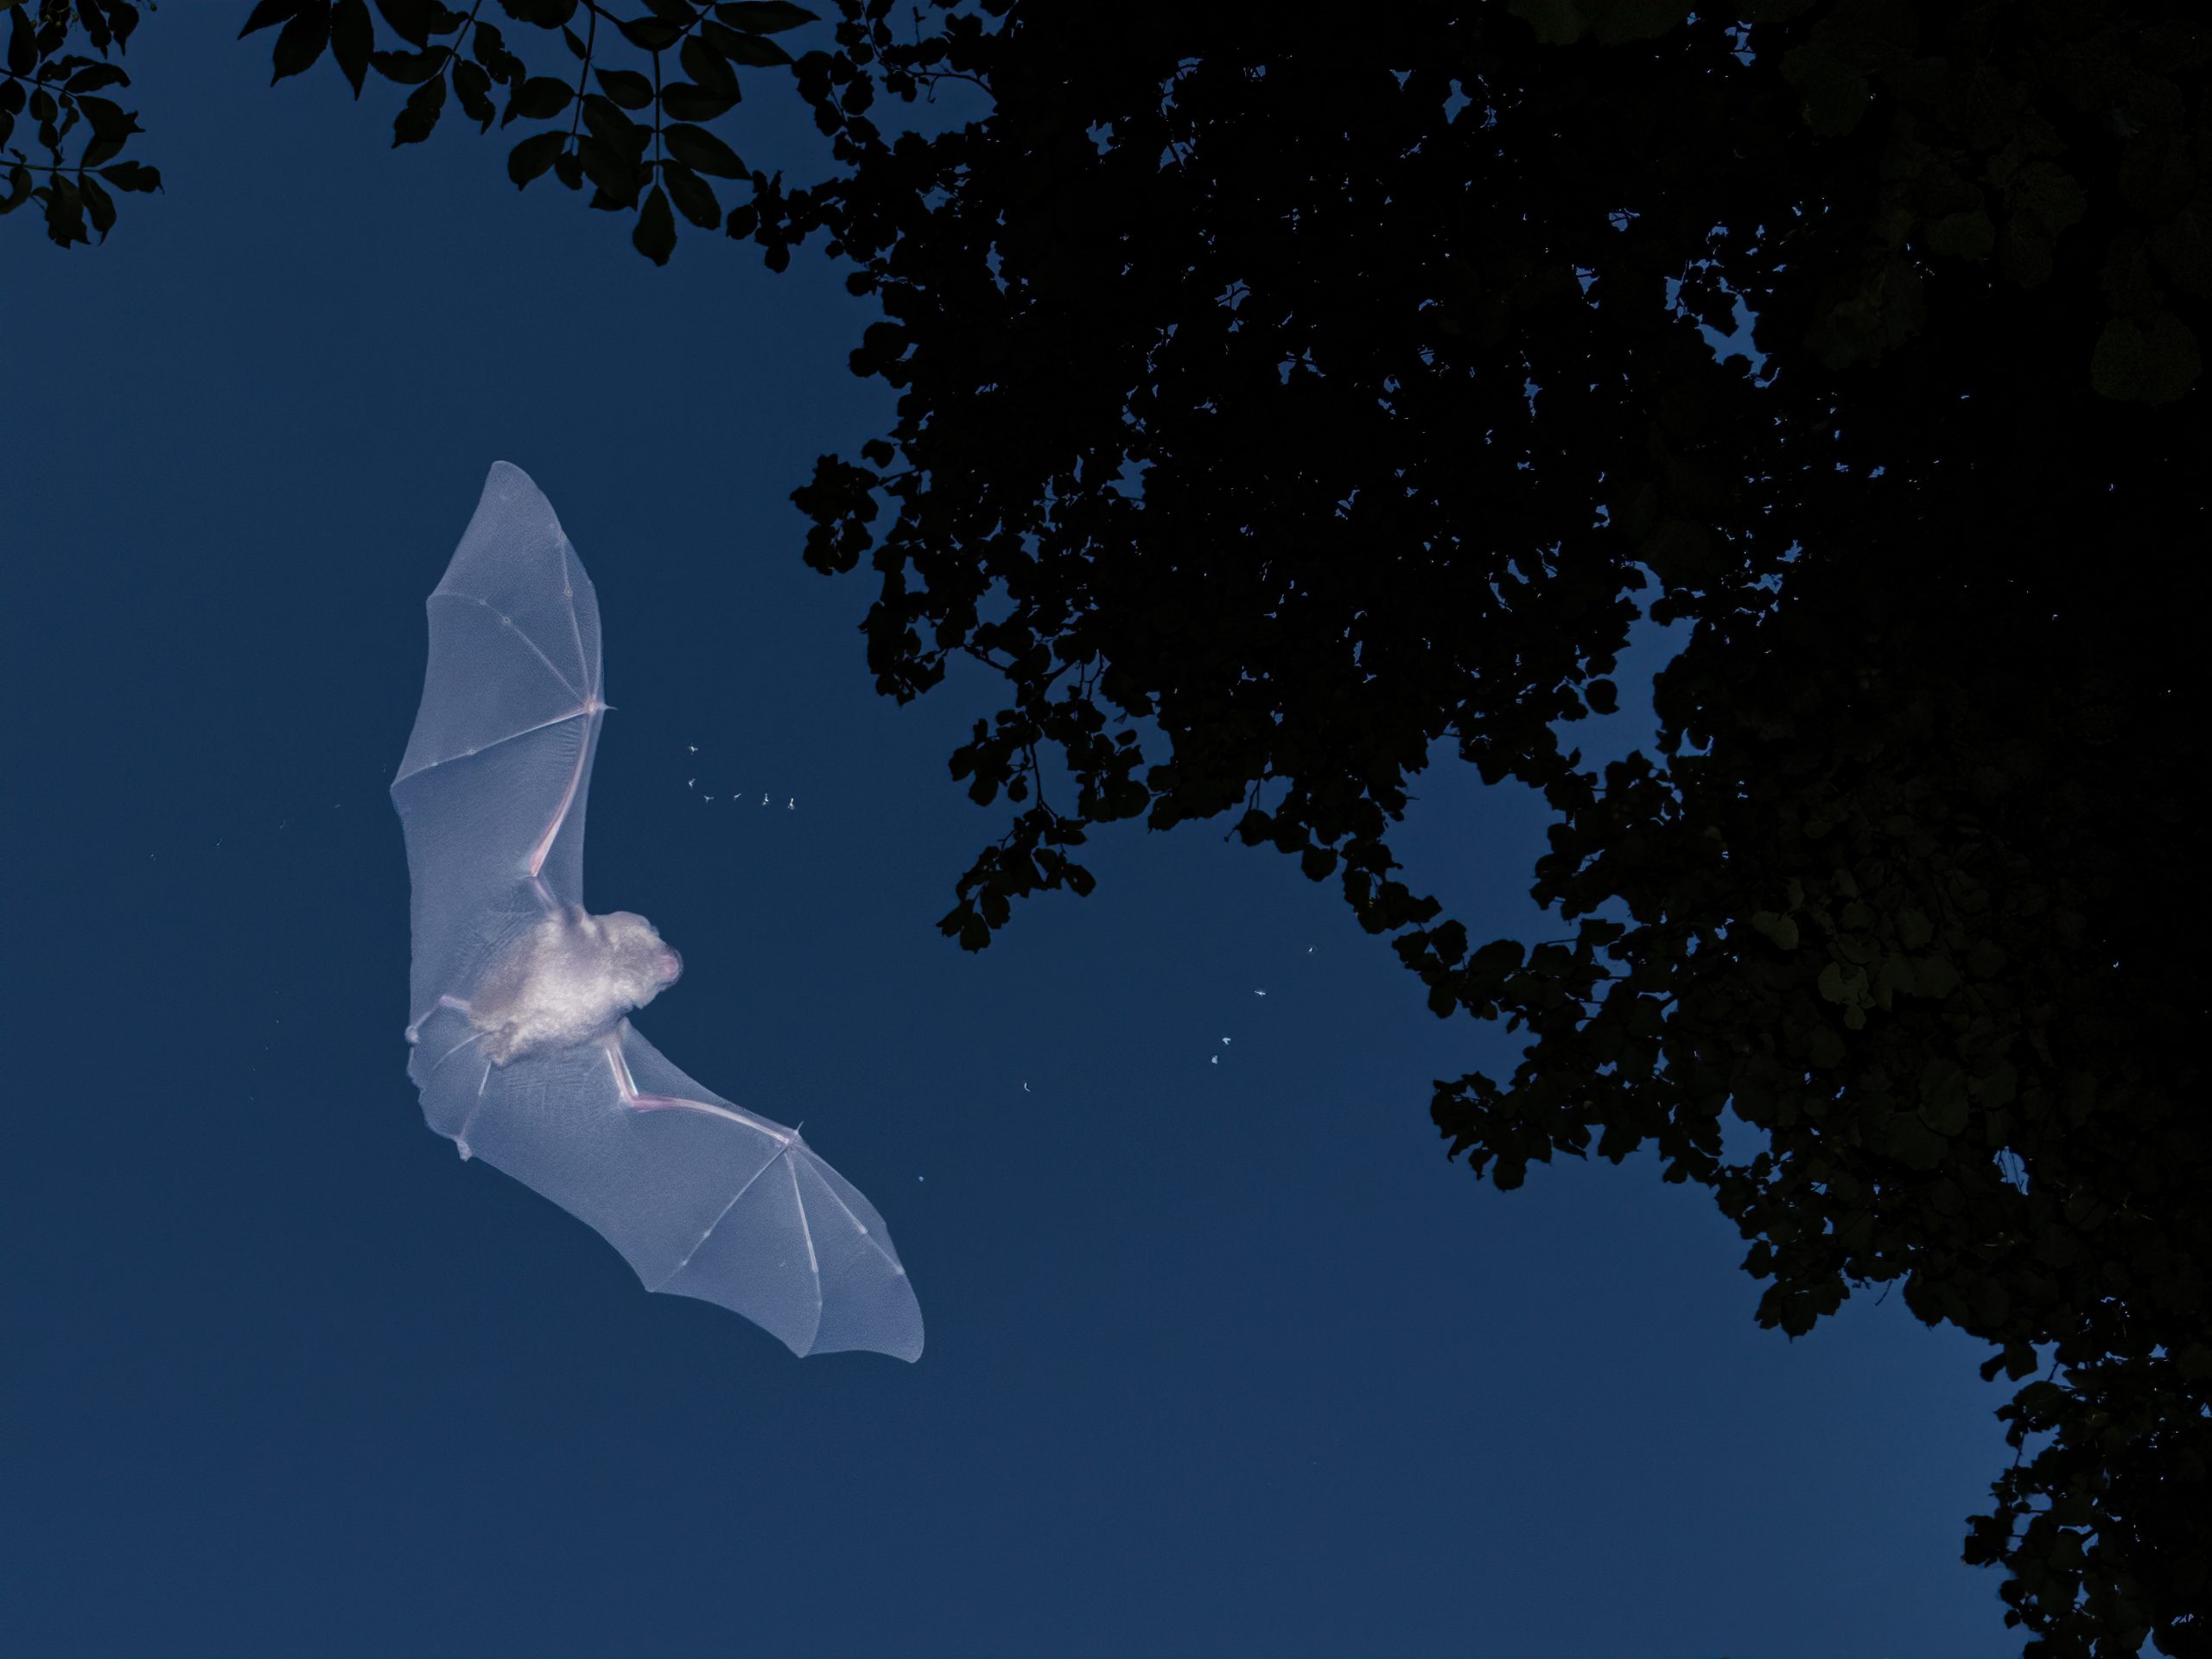
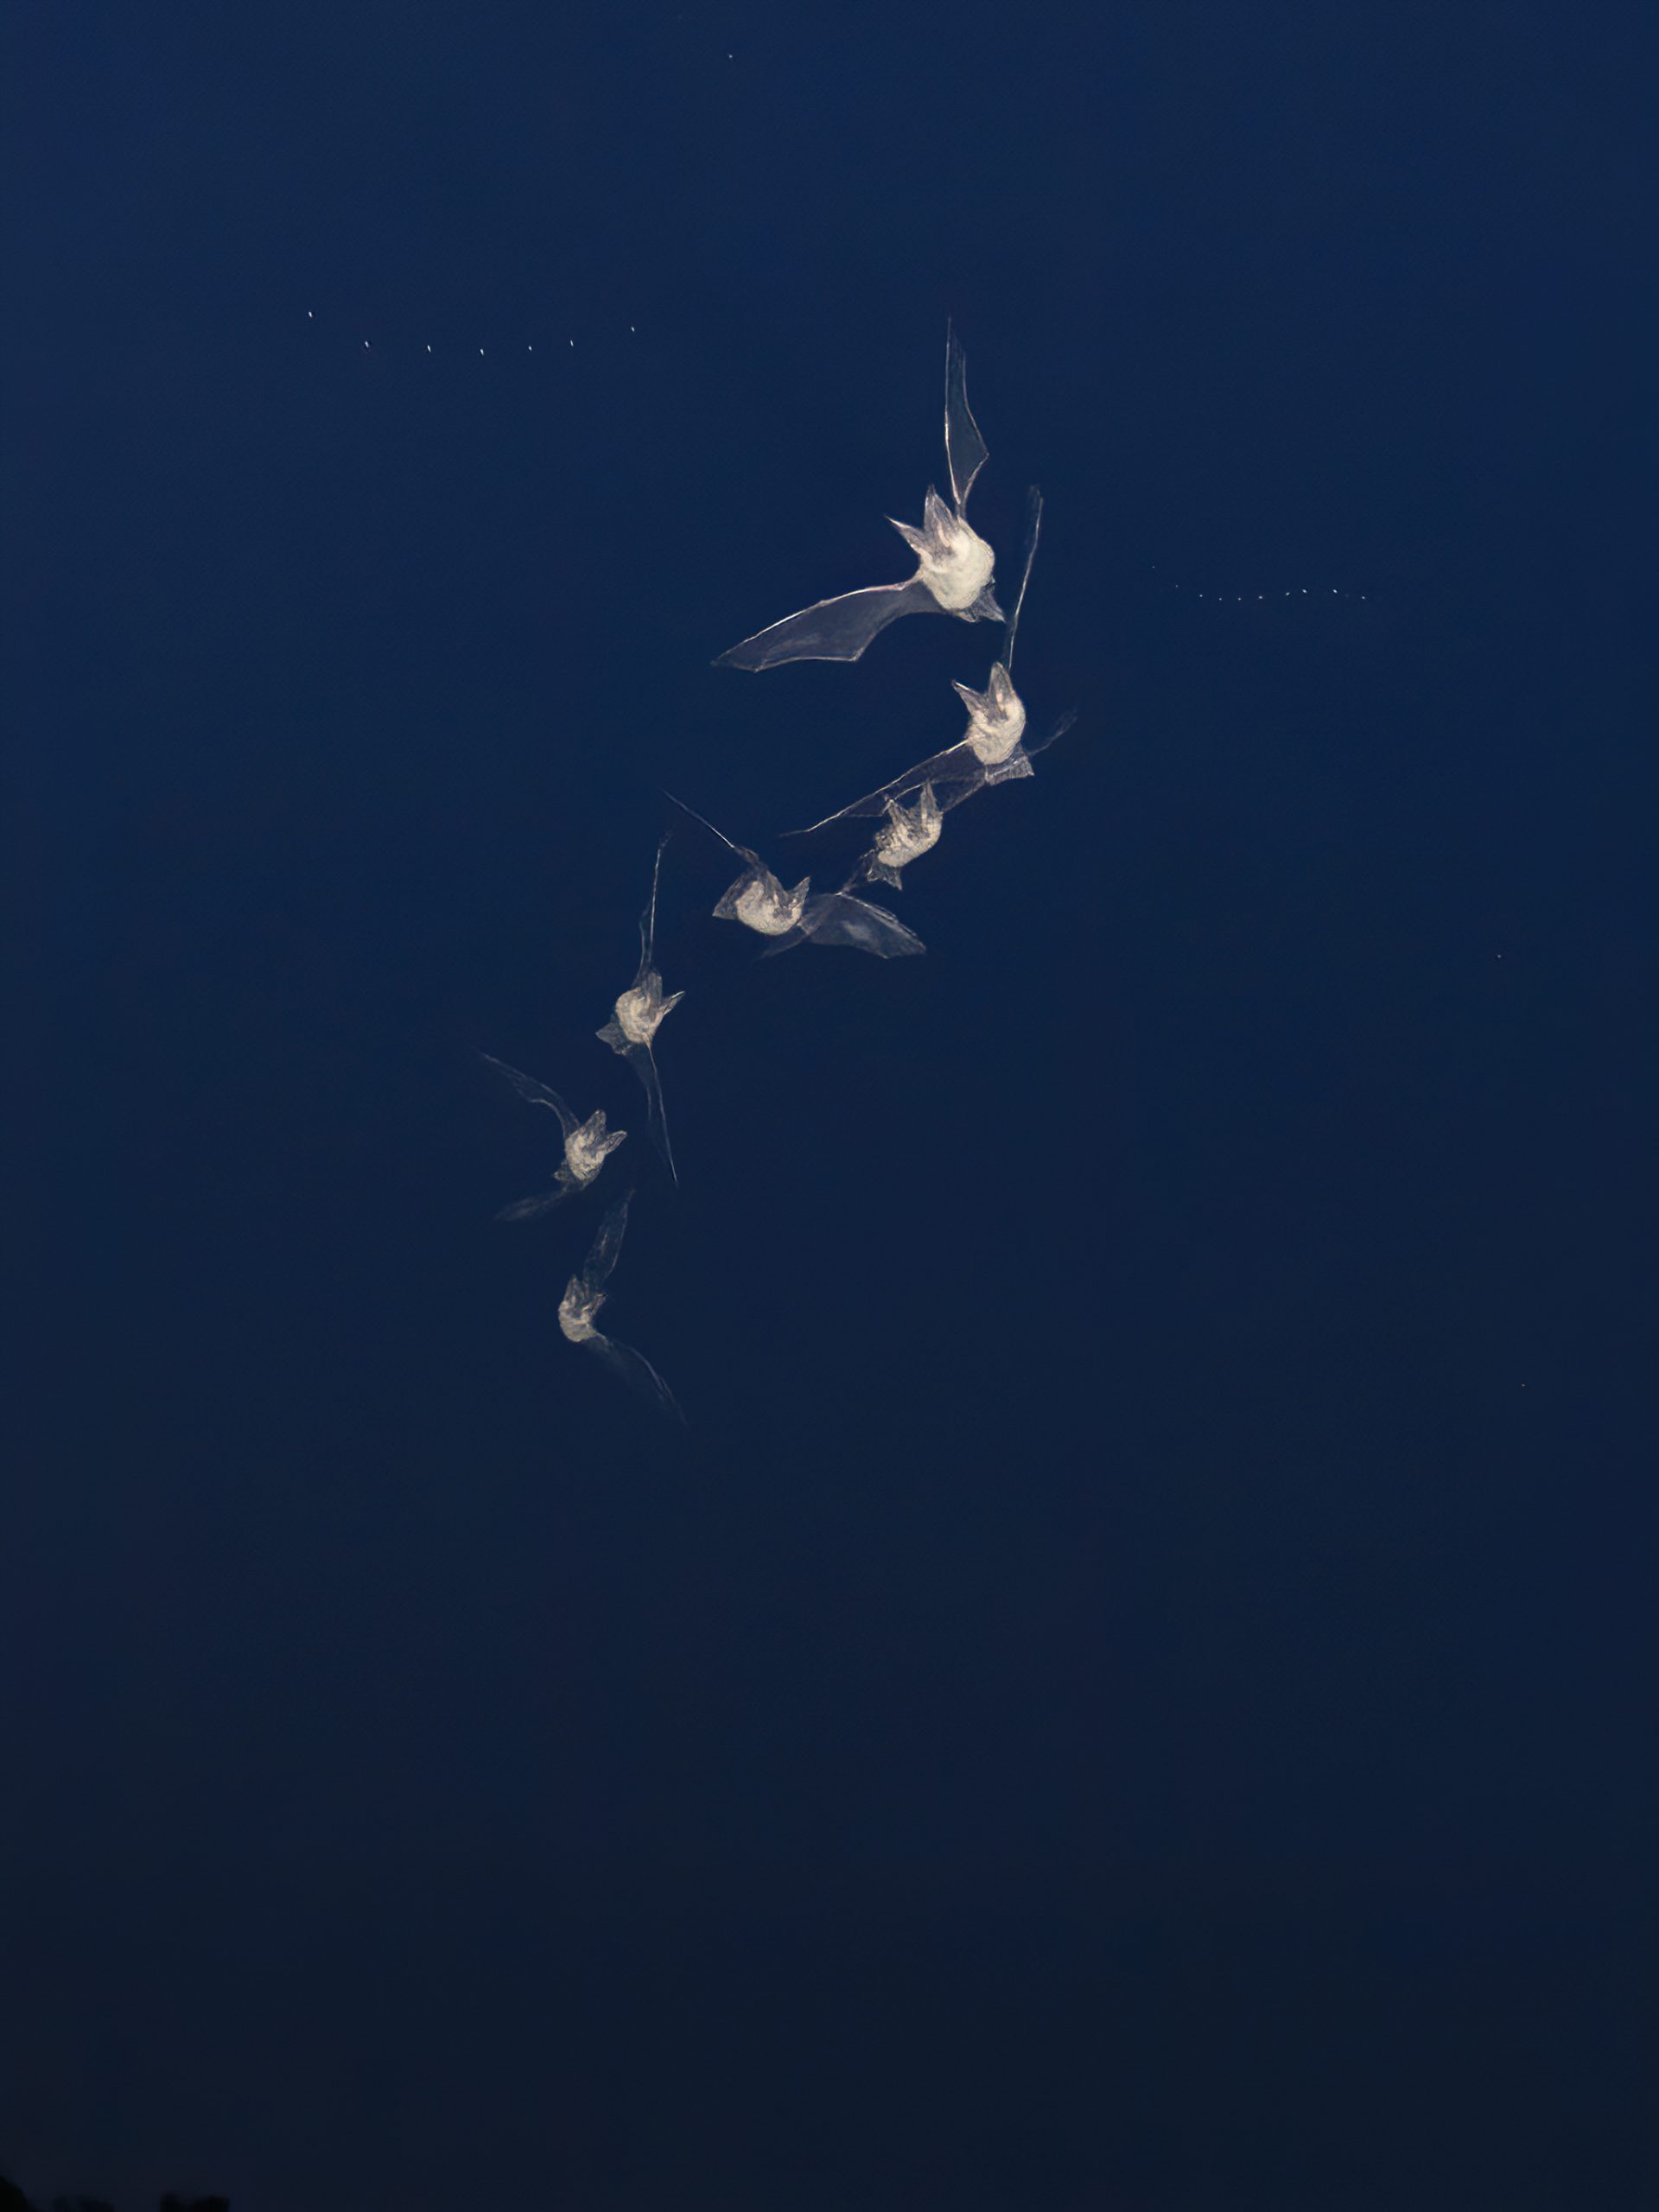
In summer 2020 I also began to experiment photographing bats foraging in open habitat (initially around our garden) using a mobile setup with the EM1x on a tripod coupled with a pair of bracket-mounted flashes set to ‘strobe mode’ (usually around seven pulses, at 14 pulses per second). I found that an ultrasound bat detector was an invaluable aid in helping to determine when the bats were approaching, and thus when was the appropriate time to press the shutter button to capture individuals passing across the frame. Whilst this is a more interpretive style of photography, I think it does give the viewer a sense of how bats really fly and forage.
The cooler nights of autumn saw a reduction in bat activity and so I called a halt to the project until 2021. Although there is great deal of room for improvement in my images, I have been pleased with progress so far. Hopefully 2021 will see further progress, with more and better images from a wider variety of species!
*Note on legislation and licensing: Whilst research indicates that bats are unlikely to be disturbed providing that flash power settings / durations are kept very low, all photography for this project has been undertaken under the appropriate Class II licence from Natural England, which I have held since 2001.
Photographing bats in flight with Olympus micro four-thirds Read More »
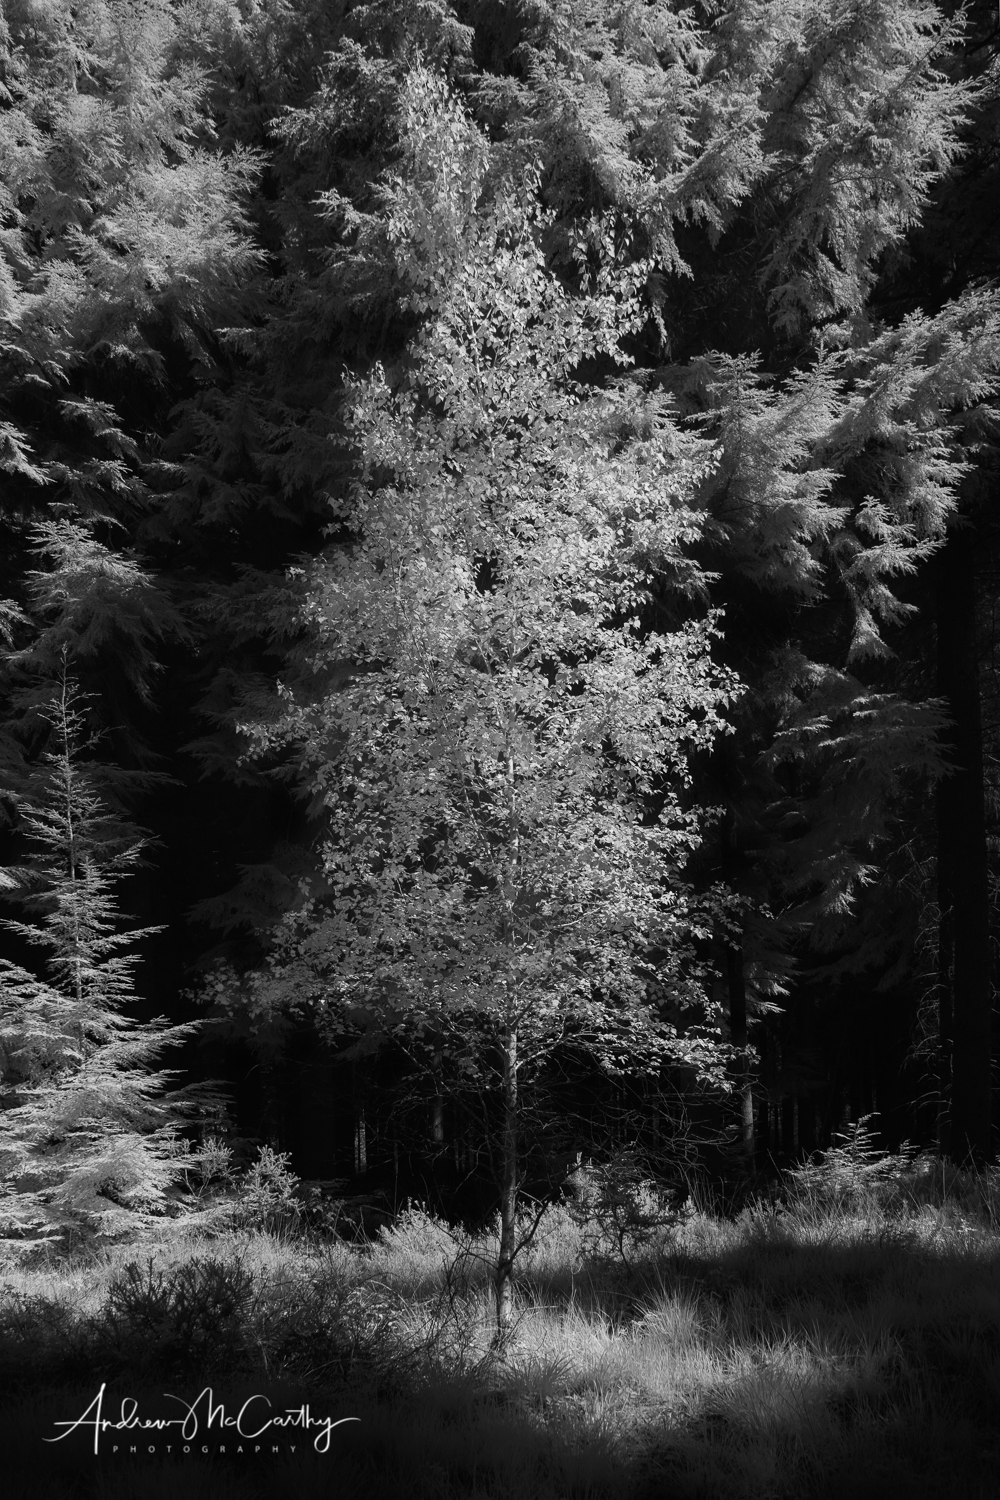
I was playing around last night with a new function in Photoshop that significantly increases resolution of the original RAW file – effectively by four times. It is very simple to use. I loaded the raw file (in this case an infra-red shot from the Sony A7 III of a nicely lit birch tree) into Adobe Camera Raw, right clicked on the image, checked the “Super Resolution” box a few minutes later I had a new file in DNG format that was four times the area of the original. In other words instead of a file that was just over 4000 px on its long edge, the new file was now over 9000 px on its long edge! That is a huge file which needs a fast PC to handle it – mine (which is around 6 years old) was only just about capable.
Now look, I am a skeptic, so I simply assumed this new file would show artifacts and overall there would be a degradation of image quality. Not so. To me this new ‘super resolution’ version was higher quality than the original, with superb detail and no artifacts I could see. Its incredibly impressive. Although I have more experimentation to do, I am really impressed by what I have seen so far. I can see some mega useful applications here – e.g with wildlife (especially birds) the subject is often smaller in the frame than I would like. This new function will give me the ability to re-size, process and crop back, whilst retaining great image quality and with a final file size large enough to print really well.
New ‘Super resolution’ function in Photoshop Read More »
This video was created for a presentation for the Guild of Photographers. It contains an overview of the techniques and equipment I use to capture images of insects with Olympus macro and telephoto lenses.
Insect macro Photography Techniques – Video Read More »
Really nice to have had a decent sized article published in spring 2019 in the venerable UK photo magazine Amateur Photographer – this time on how to photograph spring insects.
Its a perfect time of year to be brushing up on your macro and field skills for these animals so do check it out!
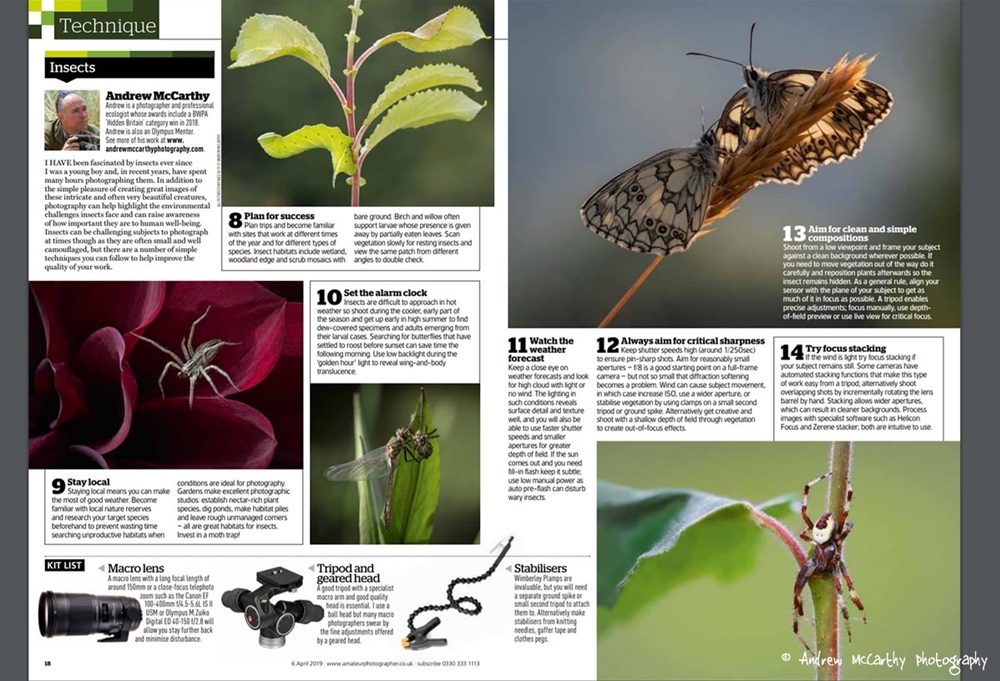
Amateur Photographer: Spring Tips Read More »
My quick guide to photographing butterflies was recently published in the April 2019 edition of Outdoor Photographer. Click on the image below to view it as a PDF.
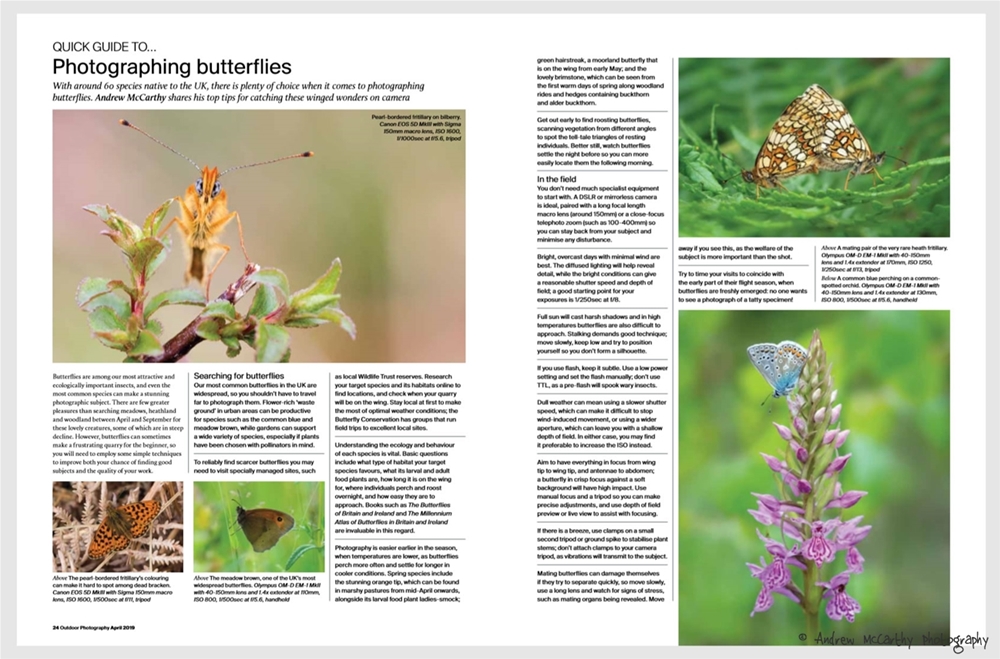
Outdoor Photographer Read More »
I was delighted to learn today that one of my macro images (a great green bush cricket) has been included as the June image in the 2019 Mineral Products Association ‘Quarries and Nature’ calendar. This is my third successful entry to this competition in four years, and was quite unexpected!
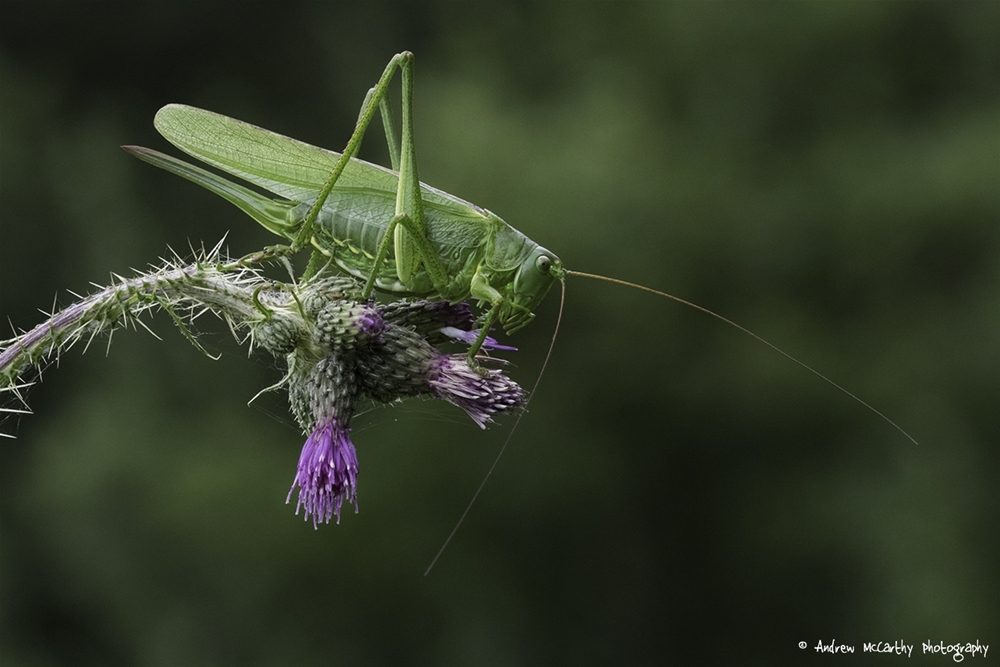
Mineral Products Association Calendar 2019 Read More »
I am delighted to have won the ‘Hidden Britain’ category in the 2018 British Wildlife Photography Awards with this stacked image of a nursery web spider. This, plus a couple of other images (which ill post seperately) made it into the 2018 BWPA book, which is availible online at https://www.bwpawards.org/competition/book. The winners were formally announced in early November and the awards were held on Tuesday 7th November at The Mall Galleries near Trafalgar Square. there was some great work on display and some inspiring photographers to share the stand with. All in all a great night!
https://www.bwpawards.org/winners2018


British Wildlife Photography Awards – Category Winner Read More »
Confused about where to begin with extreme macro stacking?
I know from personal experience that It can be really hard to know where to begin with ‘extreme macro’ photography (i.e. working at greater magnifications than life size) as the kit can appear very specialised and the process seems to require a whole set of new photographic skills and knowledge.
Getting to a starting point can be very time consuming and overall the subject is pretty daunting for the beginner. In actual fact, with patience and some basic kit (much of which can be purchased cheaply from eBay or sourced from around the house) some pleasing images can be obtained with only modest time and effort.
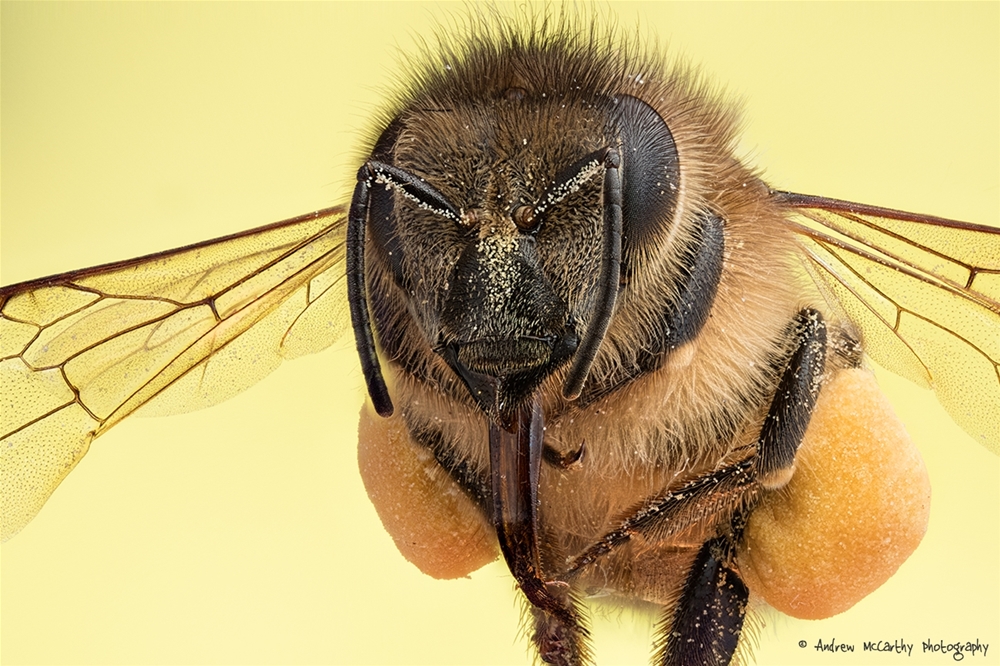
In terms of technical knowledge, there is of course a great deal of information on-line, but much of this is highly detailed and technical; even with dedicated websites it can be difficult for the wannabe extreme macro shooter to sort the ‘wheat from the chaff’. I thought therefore that it might be useful for beginners if I described the process I used when I started out shooting extreme close ups (manually) in order to obtain images such as that below of a worker honeybee loaded with pollen.
I am a Canon shooter, so some years back I invested in the unique Canon MP-E 65 lens which I now use for most of my ‘studio’ based extreme-macro photography. I use the lens purely for convenience – it say in my bag for quite a while before I decided to invest some time learning how to use it properly! It is not the best (or the only) lens for this type of work – there are many low-cost alternatives, including bellows, extension tubes (dead simple) or Raynox adaptors, that will give you perfectly acceptable results at greater than life size, and which are readily available.
I personally find the MP-E 65 extremely flexible however, as it is portable, light, simple (great for me!) and optically excellent – providing you understand the limitations involved with working at greater than 1:1 magnification (of which more in later posts) and at small apertures. The lens is is manual, so a twist of its external ‘focusing’ ring extends the magnification from 1:1 life size to x5 life size; a range which I find more than sufficient for shooting great close ups of many UK bugs.
Focusing the MP-E 65 is achieved by moving the lens forwards and backwards; this means you need a focusing rail of some kind for consistent results. If you are instead using a Raynox adaptor for example (which would allow retention of the cameras autofocus function, you would simply set your lens to AF and automate the stacking process using free software such as ‘Helicon Remote’. This allows you to tether your camera / lens combo to a PC for full off-camera remote control. Its pretty intuitive to use.
When I started experimentally stacking at higher magnification, my stacks were completely manual – I started off using an old Novoflex focusing rail which was purchased from eBay for around £20.00. This served me very well until I could justify purchase of an automated macro rail (of which more in future posts). In the following posts I’ll assume most beginners at this kind of photography will not want to spend a much money upfront, and I’ll describe my simple manual stacking process in the next post.
Thoughts on Extreme Macro Stacking – Starting Out Read More »